Showing posts with label essential oils. Show all posts

Thursday, October 9, 2008

Tuesday, October 7, 2008

Trunk Show In Nine Days....Yikes!!!


I've been wrapping, labeling, packing, and creating for weeks now for our upcoming Trunk Show.
I have no idea what to expect, especially since I'm the only bath and body booth (out of approx 23).

I put together these little gift sets to bundle up my soaps and to offer gift sets.
I'm hoping that customers are ready to shop for the holidays and will pick up plenty of gifts that are ready to give!

Thursday, September 25, 2008

I Can Smell Christmas!

I'm getting ready for my street teams (ShowMeEtsy) trunk show, which is going to be October 16th. I think gift sets will do well during the show. Last night I wrapped up quite a few sets. This set is two bars of Pomegranate Cold Process Soaps, with a wooden soap dish.
I used regular typing paper for the wrapping. I used the second half of my Paypal shipping labels.

Monday, August 11, 2008

Twenty One Steps To Making Handmade Cold Process Soap

Gather all your equipment. I have my gloves, goggles, scale, lye, beer (making beer soap), and various containers.
Getting ready to pour the beer into the pitcher.
Measuring out the beer. All materials are measured by weight and not volume.
Measuring out the Lye. You can see that I have covered my counter tops with newspapers. It keeps my counters free of soap and makes cleaning up much easier. I just gather the paper and throw it in the recycling bin.
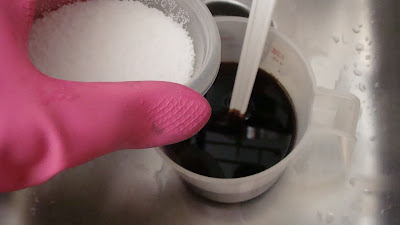
Adding my lye to the beer. I always do this in the sink since it's safer and easier to clean up.
Mixing the lye into the beer.
Watching and stirring in horror as my beer reacts to the lye and foams up and spills all over the sink...see why I mix in the sink!! This is the first time this has happened with any of my batches! It was flat (or so I thought) and has been open (and poured) for two days. Sigh....
Starting over with water this time. LOL!
Measuring out the Lye...
Pouring the lye into the water.....again....
Stirring the solution...again.....! I always wear rubber gloves and (knock on wood) have never been burned from the lye. I also wear goggles at all times.
Here I have my coconut oil measured in the pitcher.
Added the Palm Oil.
Added Palm Kernel Flakes.
Added the Shea Butter. This is 8% of the batch.
All melted and ready to go! At this time I usually leave everything and go about my day for a few hours. My kids are not home, and hubby is away at work. What I didn't show were pictures of adding the other oils in the recipe. These are added to the melted oil and help cool off the oils.
All set to go! I have measured the oils. I'm using lemongrass and black tea.
JUST stirred the lye mixture into the oils. I stir by hand for a bit to see how everything reacts.
I use the stick blender to finish up the batch. You can see it coming to "trace" right here. See how the blender is leaving a "wake" in the mixture....all set to pour!
All poured! Now I cover the mold with a piece of cardboard and then place a few blankets on top. I don't uncover until the next morning.
Thanks for taking the tour with me!

Sunday, August 10, 2008

Getting Organized

The boxes on the floor are empty. The shelf on the top has my mailing supplies.
See the ping pong table? This is where I was setting my soaps on. I had them in trays, which was ok, but I'm hoping to fold up the table to allow more space in the room.

DH brought some shelves home yesterday. They came from his warehouse (he is in the shoe business) and they transferred over to a new system so they were not using them. The shelves go all the way to the ceiling (8 feet) and are in our basement. I spent most of the day getting organized and getting all my soaps together. He also brought home new shoe boxes and I'm using these to store my cured soap.

Tuesday, August 5, 2008

Summer Hydrangea Cold Process Soap


This soap was "supposed" to be pink and green! It started to trace faster than I wanted so I quickly plopped it into the mold without any color, but I really like how it turned out. It hasn't changed colors during curing, which is nice! I took the picture with a bloom from my Hydrangea Bush. The bloom is about 8 inches wide! They started out blue, and later in the summer turned pink, and now they have this fantastic rose color! Oh, the soap smells fantastic too!

Friday, July 25, 2008

Navy Blue Hot Processed Soap

Well, they were supposed to be navy blue! I actually like this color, although navy blue would have been nice. IRL they are a dark gray blue. The soap is scented with Rosemary and Bergamont...yum!!!

Thursday, July 10, 2008

A Few Cold Process Soaps I've Been Making

Blackberry Sage - I love how the swirls came out and the lahter...omg...the lather is so pure and white and plenty!! I added some black mica to the purple hoping do get a dark purple. It's not as dark as I had planned, but I love how it turned out!
Red Clover, Ginger, and Wisteria. I love these swirls too! My house smelled so good for weeks!
I'm not sure what to name it...any ideas?
Green Tea and Lemon. This batch was rebatched and I added more lemon EO to the batch. Reminds me of a glass of sweet tea!

Sunday, June 22, 2008

Summer In St. Louis!

A beautiful blend of Jasmine and Sandalwood! The colors were supposed to be purple and green, but the purple turned out my "gray"....but it still has a wonderful scent!!

Monday, June 16, 2008

Hot Process Soap

I tried my hand at hot process soap last night. I used the oven, and although they smell wonderful, I'm not sure I like the appearance. Here is a big hunk of soap! It smells soooo good...scented with Patchouli and Ylang Ylang Essential Oils.I also cut some smaller bars for guest bathrooms.
And with the leftover shreds, I made Soap Balls! These are huge and weigh over 4 ounces each!

Saturday, May 31, 2008

Whew! I Just Finished Another Batch Of Cold Process Soap!

Ok, here we go! I have measured out all the oils and the hard oils are all melted. See the pen in the picture? I like to check off the oils I add to makes sure I don't miss one!


In this picture, I have just added the lye to the oils. They are the same temperature right now.


Here I have added the color. I diluted the color and used a dropper to add the color. Don't ask me about my "mustard" colored soap I made the other day!


The color is all blended now and it's coming to a nice trace. Right after I took this picture, I added the poppy seeds. They came from my very own
garde
n. Here I have just poured the soap, textured the top a bit, and sprinkled some more poppy seeds on top. The piece of cardboard that you see to the right of the mold goes on top. I then take several blankets and cover the whole thing up for 24 hours.


Here it is! All cut and ready to go...well...not yet...it has to cure for about 3 to 4 weeks!