Today I made one of my favorite scents, Patchouli Orange Vanilla! If you have not tried this combo, you MUST! I swear, it is addicting!
I used beer for some of the liquid.
For part of the soap I used organic cocoa powder for color and ground vanilla beans for exfoliation. The soap itself will not be too dark, so the cocoa powder will provide some contrast.
I used dark Patchouli for the blend, which darkens to soap a little.
I bought some mixing bowls at the dollar store a few weeks ago. They really come in handy, although they don't handle too much weight. I like to use them to whip body butters, or for mixing scent into liquid soap. Just be sure not to fill them to the top with heavy liquids!
I added Bentonite clay to the entire batch. That is what the dark spots are....the clay sinks down to the bottom of the pot. I stick blend the oils and clay together before adding in the lye/beer mixture.
I sprinkled ground vanilla beans on the top for contrast. In the above picture you can see the vanilla soap swirled with the patchouli/orange soap.
The little mold is for my soap nuggets. They are perfect for sample soaps and weigh approx 1.3 ounces each. I sell sets of sample soaps in my Etsy shop.
Stay tuned for the cut soap pictures!
Showing posts with label all natural soap. Show all posts
Wednesday, March 19, 2014
Friday, November 30, 2012
Making Up For Lost Time - Making Soap!
It's been busy in A Breath Of French Air's soap kitchen this month! I've been cranking out the soap, so I thought I would share with you some of my new products.
Eucalyptus Charcoal soap - It's invigorating, fresh, and wonderful for the skin! Charcoal draws out toxins in the skin, so it's perfect to use as a facial soap! I divided up the batch and used gold mica for the swirls (below) and gold stars on top. The stars are skin safe and wash off after the first use. I think they both turned out awesome!
The top two are my Lemongrass soaps. I used the hot process method, so they are a little more rustic looking. They have a greenish tinge since I use French Green Clay, which contains actual decomposed plant material, making French Green Clay very nutritious for the skin. Calendula petals are on top to add some prettiness!
The last soap I am going to show is my famous Pumpkin Lavender soap. It's all the rave, and hard to keep in stock! The scent sounds weird, but it's amazing together!
I have many more to show, so I will be back with more pictures! Thanks for reading.
Eucalyptus Charcoal soap - It's invigorating, fresh, and wonderful for the skin! Charcoal draws out toxins in the skin, so it's perfect to use as a facial soap! I divided up the batch and used gold mica for the swirls (below) and gold stars on top. The stars are skin safe and wash off after the first use. I think they both turned out awesome!
The top two are my Lemongrass soaps. I used the hot process method, so they are a little more rustic looking. They have a greenish tinge since I use French Green Clay, which contains actual decomposed plant material, making French Green Clay very nutritious for the skin. Calendula petals are on top to add some prettiness!
I have many more to show, so I will be back with more pictures! Thanks for reading.
Wednesday, January 25, 2012
Making Spring Soap
The first video is where I mix my oils, lye, essential oils, and color.
I made the embed duck soaps, and balls, about a month ago. I think they look really cute!
Now you know how messy soap making is!
I'll post the cut soap and remolded duck soaps next.
I made the embed duck soaps, and balls, about a month ago. I think they look really cute!
Now you know how messy soap making is!
I'll post the cut soap and remolded duck soaps next.
Thursday, January 19, 2012
Sharing Work Spaces
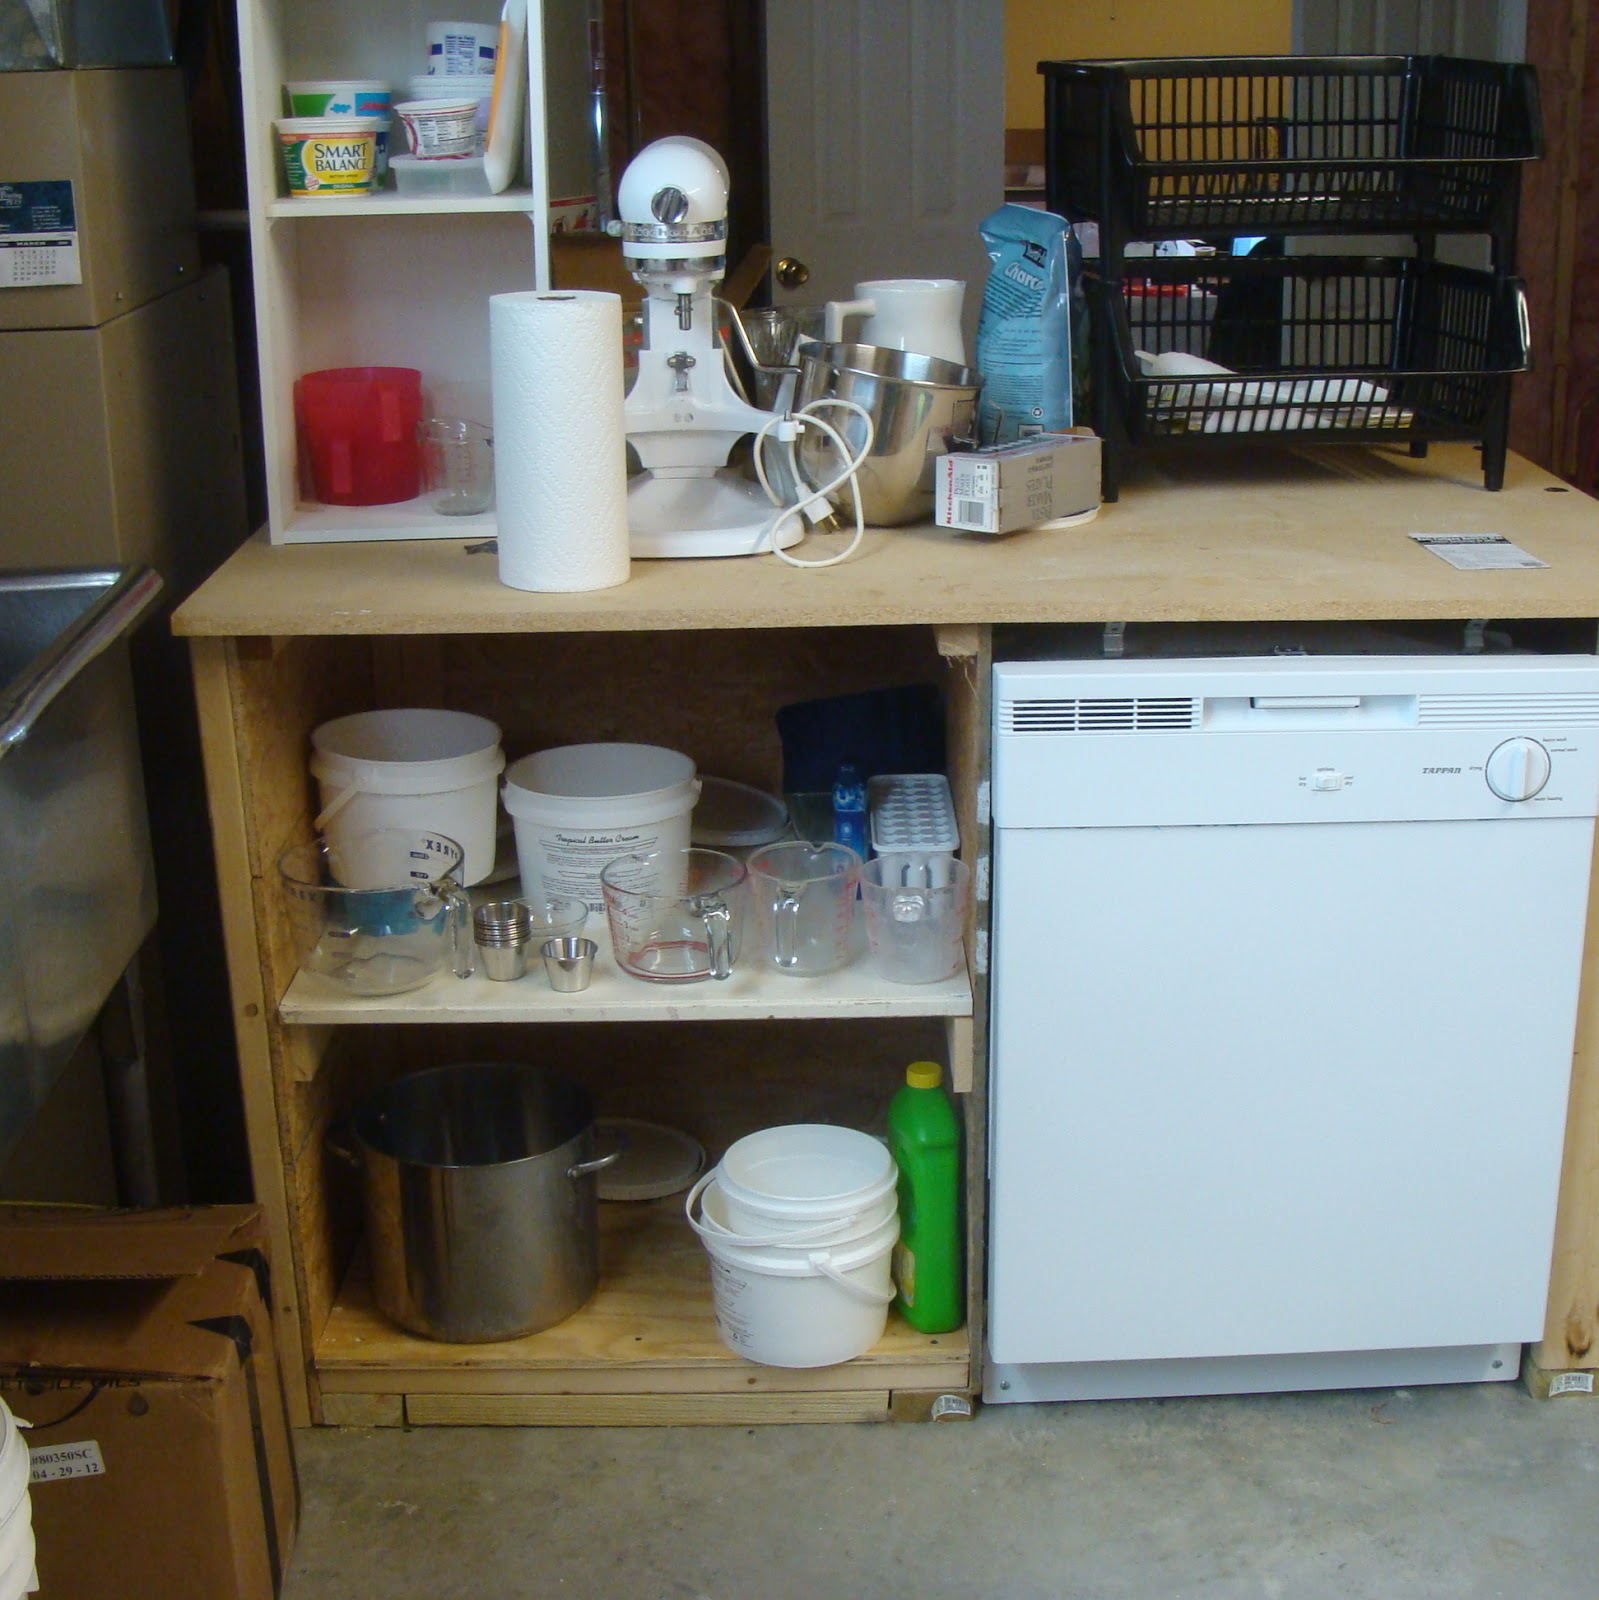
Our basement is divided into two spaces. The other side is the finished space with carpet, furniture, shelving, and a tv. My work space is in the unfinished part. I have been working on my soap kitchen for the past few days and I thought I would share my progress. Above it is what you see when you walk into this part of the basement. To the left is a long table which holds my hot plates, wax, and all the things I need to make candles.
Here is the "room" to the right. The counter top and sink were donated. We paid for the lumber and the labor to install them. We also had to purchase the faucet, which reaches all 3 bins! I had shelves installed above the counter just to hold my fragrances and essential oils. I wanted it only "one bottle" deep so I could easily find the oil I wanted. My soft oils and other ingredients are on the shelves. Under the sink are my 50 pound tubs of coconut and palm oil.
I wanted a dishwasher so we install the least expensive one made....lol! It turns on, you can control the on/off heat and light/regular load. That's it, and that's all I needed. Our handyman made a box for the dishwasher and some shelves for "stuff". It's bare plywood which I would like to paint this spring/summer. The brown box in the corner is our furnace. As I said, this is a very rustic kitchen, but when you are slapping soap around and tossing candle wax, rustic is the best!
At the end of the counter is a microwave which I use to melt butters, and oils. I also have my ipad stereo on top of the microwave. I have to blast music when I soap! My husband surprised me with some rubber mats last night. They are much more comfy to stand on than the thin rug I had down before!
I just love my sink! It was filthy when I got it and had paint splattered on parts. It has lots of love dents all over it, but it works perfect! I use the left side to wash my pots and pans in, and the middle is where I cool my lye. The right side is for draining items that don't go in the dishwasher.
Thanks for reading! I would love for you to share your workspace too! Leave a comment, and a link, so we can all share.
Elizabeth
Saturday, November 19, 2011
Christmas Rush
My blog has been lonely for the past month! Getting ready for the holiday rush and doing a show has put me behind on posting!
Here are a few items I brought to the show. I didn't sell any of the cupcakes, but I received lots of compliments. The box is 4x4 and I think it makes a great presentation. I have the boxes listed as gift wrap in my Etsy shop. Be sure to check out my cupcake soaps. I have many different ones to choose from!
I sold a few lip balms, and Fig was the favorite among many.
I did sell many of my lotion bars. I had a few out for demo's and I think that helped a lot.
Stay tuned! I will be having a special on Black Friday! I will post the special ONLY on this blog, so stay tuned!
I sold a few lip balms, and Fig was the favorite among many.
I did sell many of my lotion bars. I had a few out for demo's and I think that helped a lot.
Stay tuned! I will be having a special on Black Friday! I will post the special ONLY on this blog, so stay tuned!
Wednesday, September 14, 2011
Too Early For Halloween?
I know it is early for Halloween, but when you make soap, you have to plan WELL in advance!

I wanted this soap to be for Halloween, but I wanted it to be more versatile. I added purple paper and a black spider to the package. After Halloween I can simply replace the wrapper not associated with Halloween.
I think they turned out cute! I will bring a few into the shop and the rest will be sold on Etsy and other outside shops I sell at.
Candle sales are starting to pick up. The top one is scented with pumpkin spice and the bottom is carrot cake. I wanted the topping to look like cake, but I'm afraid it might look like puke! What do you think? It smells awesome!
Saturday, July 2, 2011
Cut and Curing
My apple pie soap loaf is cut and on the curing rack. They should be ready in about 3 weeks. This mold makes taller soap, so the slices are a little thinner than my other loaf.
I was just using up the extra icing, but I do like how they turned out.
The cupcakes turned out great! These will be ready in about 4 weeks.
I was just using up the extra icing, but I do like how they turned out.
The cupcakes turned out great! These will be ready in about 4 weeks.
Wednesday, June 29, 2011
Sunday, June 19, 2011
More Etsy Tips
I hope everyone had a great weekend! My son came in town, so I had a wonderful time. :)
More tips to share!
1. List new items and list often. I try to list a new item at least twice a day. I have found, using google, and most of my visits come around noon and again between 8 and 10pm. I try to list new items, but if I don't have anything to list, I will renew an item.
Renewing will bring your shop up to the "front of the lists". It doesn't always brings tons of views, but I do think it keeps your shop "fresh".
2. Visit the Etsy forums. I can't tell you how much I have learned from the forums. Granted, you must take advice with a "grain of salt", but there is a lot of good info in the forums. Ask lots of questions and most of the time you will receive good advice. The forums have changed in the past few months and sometimes you have to wait longer for answers to your questions.
3. Visit the Etsy blogs. No, I don't read each and every one, but I do try to each week. Be sure to comment on the blog. Why? Because every time you comment on Etsy you are leaving a link to your shop! I have noticed an increase of views each time I comment on the blogs. Google also picks up your comments!
I hope these tips have helped you. Please feel free to post any questions you may have and I will be happy to help you.
Saturday, May 7, 2011
New soaps for my Etsy shop, ABreathOfFrenchAir
I have been busy in the soap kitchen lately and thought I would share with you.Gentleman's Club is a wonderful blend of Sandalwood, Cedarwood, Amber, and a touch of Cinnamon. It really smells like heaven! I think it's a great unisex scent, so don't let the antique ties fool ya!
This soap is made with Indian Sandalwood fragrance. It's a nice spicy scent. I'm still working on a new name. Any ideas?
Ah, another beer soap! This one is scented with Cedarwood and Ylang Ylang. I love this soap and it's in my shower right now.
Monday, April 25, 2011
Gardening Soap for my Garden Club
May 7th is our local garden club plant sale. The money collected from the sale is given to local schools to promote gardening skills through hands on gardening. If you are in the Webster Groves area, stop by! Every 1/2 a bar of soap will be given out to everyone shopping. I am donating 10 bars and the rest will be in my Etsy shop soon.
I think the packaging came out really cute, don't you?
Friday, November 19, 2010
I've been a busy bee for the past few months. I have so much to share with all of you, but I won't bombard you with too much.
New foam hand soapThis is my favorite scent....well....one of my favorite scents...there are too many that I love! Margarita Lime foam soap is the first of a series of foam soap. This soap was made by scratch, so it's filled with skin loving oils and not the nasty additives you get in store bought soap. I only bought 12 bottles to see how well they sell before I purchase a large wholesale order. I filled 3 with the Margarita Lime soap.
Brown Sugar Fig handmade soap....gosh...this is another of my favorite scents! Sweet, and sugary cold process soap. I used cocoa powder for the thin line between the layers.
My new lotion sticks are cute as a button! They are about an inch tall, so they are perfect for your pocket or purse.What are lotion sticks? Well, I like to tell people that they are lip balms for your body! Thick and extremely moisturizing, you rub the bar on very dry skin or nails. I like to use them on my cuticles and my heels.
Right now I have Candy Cane and Eucalyptus, but I will be adding more soon.
Stay in touch.....much more coming soon!
Monday, July 12, 2010
Body Wash From Scratch!
There are 8 short video's, which I took with my digital camera. Maybe Santa will bring me an actual video camera this year!

I decided to go back to my old labels and my yellow and blue colors. I think it helps brand my products and are easily noticeable.
Sunday, February 7, 2010
Spring Forward!
I don't know if it's because of all the dreary days St. Louis has had, or because of the upcoming snow storm forecast for tomorrow, but I am itching for Spring. I worked on my Spring line today and decided to play with some soap base. This soap was made with Tulip fragrance oil, but it smells more "green" to me, so I'm going to market it as a unisex (hate this term!) scent.

I colored the bars with teal mica and used clear soap for the middle. I love the contrast with the clear soap! I named the soap Spring Forward.
My lip balm inventory is very low, so today I made several batches. Cola is a new scent and it smells just like Coke! I also made Cucumber Slices, Birthday Cake, Snickerdoodle, and Dark Chocolate.
I found these mugs at a local store, and immediately thought CANDLES! I made two of each: Blue = Clean Cotton, Yellow = Lemon Poppy Seed, and Pink = Peppermint Bark
All of these will be added to our new shop at Fusion, which is located in Chesterfield Mall (second floor, next to Sears), and to my Etsy shop.

I colored the bars with teal mica and used clear soap for the middle. I love the contrast with the clear soap! I named the soap Spring Forward.
My lip balm inventory is very low, so today I made several batches. Cola is a new scent and it smells just like Coke! I also made Cucumber Slices, Birthday Cake, Snickerdoodle, and Dark Chocolate.
I found these mugs at a local store, and immediately thought CANDLES! I made two of each: Blue = Clean Cotton, Yellow = Lemon Poppy Seed, and Pink = Peppermint BarkAll of these will be added to our new shop at Fusion, which is located in Chesterfield Mall (second floor, next to Sears), and to my Etsy shop.
Monday, October 19, 2009
Hot Process Handmade Gingerbread Soap From Scratch
It was a cold and damp day, so I thought it would be a great day to make more soap. I'm running low on basic soap, but I also need some holiday soap....so I'm made Gingerbread Soap!In the above picture you can see the hard oils melting. I have coconut, palm kernel, shea butter, and palm oil. Off to the side (which you can't see), I have my carefully measured lye/water solution and my soft oils. My soft oils are olive, rice bran, and castor.
While the oils are melting, I got my mold ready to go. I put oats on the bottom of the mold. This will actually be the top of the soap.
I also added ground oats and cocoa powder. The oats are great for your skin and the cocoa is for coloring the soap.
This is my favorite part...right after I poured the lye/water mix into the melted oils. In the above picture I just turned on the stick blender.
This is what it looks like one second after blending.
Here you can see a light trace. If I were making cold process soap, I would stop at this point, separate the mixture and add coloring. Since I'm hot processing, and I'm using cocoa for color, I'm skipping this step.
This is what it looked like after it came to a medium trace and I added the oats and cocoa.
Now the soap is "cooking". You can see the outside of the pot starting to gel.
About 20 min. later. It cooks from the outside in, and when the white spot in the middle is tiny, or disappears, it's finished!
This is a crummy picture, but this picture was taken after the soap had cooled to 170 degrees and I added the Gingerbread oils to the soap.
I added oats to the top (bottom of soap), but most of it fell off after taking it out of the mold. Hot process soap is ready to use as soon as it's finished with the "cook". It takes several hours for the soap to cool.
All set to go! See the oats? This was the bottom of the mold.
All cut and ready to go! I like to let my soap sit for a week or so before using. You don't have to, but the soap will last a lot longer if you do.Now you know what it takes to makes soap!
Subscribe to:
Posts (Atom)